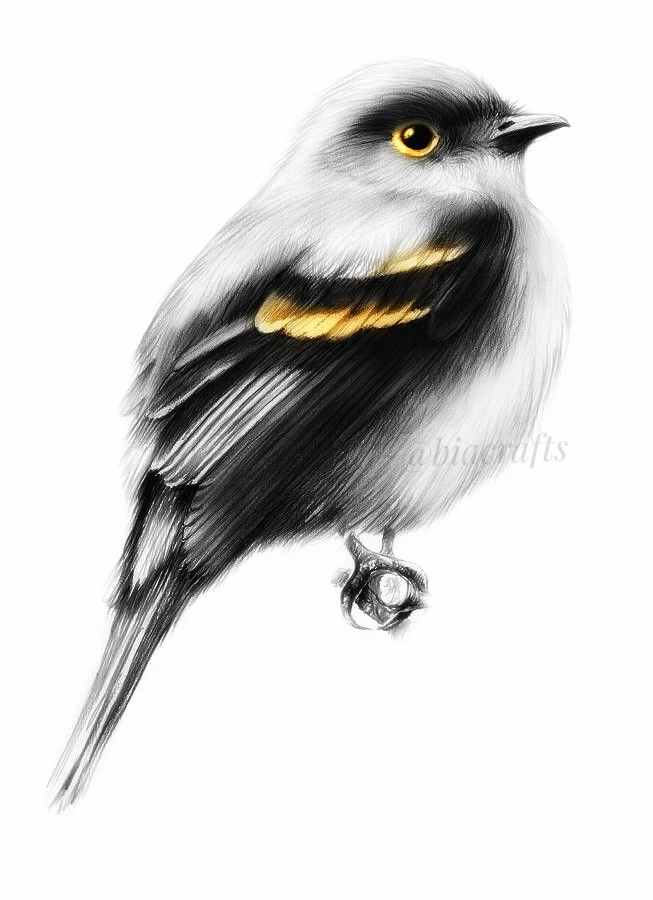
LEARN TO DRAW A BEAUTIFUL LIFE-LIKE BIRD!
- Abeera Mohammad
- Mar 13, 2023
- 4 min read
Birds are my favorite creatures to draw so i decided to share with you
the basic techniques and an easy way to draw a realistic birdie using
pencils!
TIP: If you start to look at things in terms of basic shapes,
whether your reference is three-dimensional (an object) or
two-dimensional (a photo) or simply in your imagination,
you’ll notice that replicating those simple shapes in either a
larger or smaller size is an efficient way to begin a drawing.

MATERIALS:
HB or No. 2 pencil, (2B, 3B ,9B ,3H,4H, 8H) well-sharpened
Sketchbook or drawing paper
Eraser
Blending stump or tortillon or Q-tips
Reference photo of your favorite bird with normal contrast that clearly shows the head and the eye.
Step #1 - DRAW AN OUTLINE OF THE BIRD’S HEAD


The first step is draw a simple outline of the shape of the bird’s
head. No details just yet! Use your eraser to change your lines if you
need to, until you arrive at a simple outline that captures the right
shape of your reference birdie.
Then draw a line depicting where the eye sits, straight through the
center of the beak. After you have your outline, erase any extra lines
that you don’t need.
Step #2 - SHAPE THE EYE AND THE BEAK


Draw a circular shape for the eye, paying close attention to the shape
of your bird’s eye in your reference. Mine was very round and sat
right behind the break on the line that I had drawn.
Then, the line you drew before becomes the center of the beak. Again,
pay close attention to your reference and draw the upper and lower
beak using your original line as the center.
These are typically very simple shapes, but you need to pay close
attention to get the outline just right.
Step #3 - FOCUS ON THE EYE
This area is usually the most important element in my pieces. It’s the
place I aim to have the most detail, contrast and crispness, in an
effort to help the viewer connect to the animal in the drawing. After
drawing the eye’s basic shape, I blocked in the surrounding areas to
ensure proper placement and proportions, using an HB pencil lead in a
mechanical pencil. I used a 9B pencil to fill the pupil’s bottom half,
which will be the darkest part of the bird. Next, in order to
incorporate the reflection of the surrounding trees, I used HB lead in
a technical pencil to push some of the graphite from the pupil area in
order to suggest tree shapes. Finally, using 4H and HB leads, I pulled
out radiating lines to fill in the iris.
Step #4 -FILL IN THE FEATHERS


Now lighly rinder the body and begin to fill in the feathers using
short feathery strokes in the direction you see them growing.
The aim is not to draw every feather, but a suggestion of feathery
stories that imitate the direction the bird’s real feathers grow in. I
started working on these areas by drawing short lines made with
mechanical, technical and wood-cased pencils and using pencil grades
in the middle range (3H–3B). I then added an overall coat to the
bird’s body using 4H marks — without applying a lot of pressure — to
indicate things like feather barbs, markings, toe scales and beak
texture.
TIP: At this stage, you should focus on the direction and length of
each mark, and you should use curved strokes for the beak, toes and
other features to suggest their form. For feathers — and fur and
scales — always work from the tail toward the head so these elements
appear to overlap as they do in nature. And don’t apply a lot of
pressure when drawing, these unnecessary marks can easily be erased
later.
Step #5 -ADD A DARKER LAYER
Now fill in the bird’s beak. Using the tip of your pencil, lightly
fill in the upper and lower beak, making note on your reference to
where it is darkest and lightest. and then add the darks. Typically
the upper beak becomes light toward the center line, and the lower
beak is all dark.Finally, carefully fill in the upper half of the eye
with tiny strokes, leaving little flecks of white paper. These flecks
give the illusion of reflection and are what give your bird’s eye that
spark it needs to look real. It’s so tiny, but take your time.
Step #6 -COMPLETE THE FINISHING TOUCHES
Before you use a blending stick to put the final touches on your bird,
take a few moments to add in some of the darker areas you notice on
your reference image..When you’re happy with your shading, lightly
smooth over the drawing — except for the beak and the eye — with a
blending stump or tortillon. Always use your blending tool in the same
direction of form as you did your initial pencils marks. Use a very
light touch to avoid embedding the graphite into the paper, and so
that you can still see the feathery strokes through the blended
graphite. Lastly erase the rest of all unnecessary initial pencil
lines and you have a beautiful picture to add to your collection of bird drawings!
I really hope you enjoyed this simple step by step tutorial on how to draw a realistic bird with pencil. If you have any questions or requests, let me know in the comments below! Your feedback would be greatly appreciated

Comments